Over the past few years, there has been a noticeable growth in bikepacking. With the addition of routes and events such as the Central Ontario Loop Trail (COLT), Simcoe County Loop Trail (SCLT), BT700, Grand-Nith-Ramble, Cannonball 300 and most-recently the Log Driver’s Waltz (LDW), bikepackers have a range of events that offer different levels of difficulty. These events range in distance from 160 km (SCLT) to over 800 km (LDW).
My introduction to bikepacking started in 2017, first with an overnight to Turkey Point and later a four-day trip around the COLT. Since that first year, I’ve experimented with different packs and gear setups and a while this will be an on-going process, I thought I’d share my current set-up (which I used for a three-day trip around the SCLT back in August).

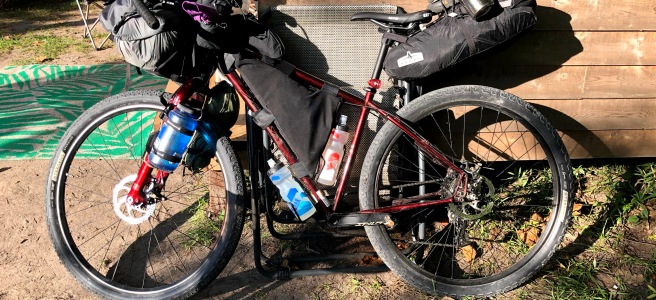
This photo shows my Salsa Fargo set up at the beginning of the trip (I need to remember to take drive-side photos of my bike!).
- Saddle bag: Arkel SeatPacker 15
- Casual clothes, sleep pillow (inflatable), extra cycling clothes, towel
- Strapped to the pack: Teva sandals, stainless steel coffee mug
- I love this seat bag. It holds a lot and it comes with a solid metal rack that attaches to the seat and seat post. The setup prevents the bag from swaying. Very solid system
- Frame bag: home made
- Tools, mini lock
- Tent poles
- Some snacks and food
- Handlebar system: Revelate Harness, 15 L dry bag and Revelate Egress Pocket
- Drybag: Tent, Fly, ground sheet, sleeping bag
- Egress Pocket: Portable charger and cable, snacks, first aid kit, toiletries
- This handlebar system replaces my previous set-up from Arkel that I just couldn’t get working properly. The straps kept loosening, which resulted in the bag lowering and rubbing my front tire. The Harness by Revelate attaches firmly to the handlebar and the dry bag straps in securely. The Egress Pocket wraps around the drybag/harness and is a very useful addition for things that need to be accessed readily. The pocket can also be used independently, without the harness.
- Top Tube Bag: Oveja Negro Snack Pack
- Snacks, electrolyte tablets, gels, gummies
- This small 1 litre bag is useful for snacks. Mine has a hole in the top that has been repaired with hand stitching, but I’m looking for a replacement. I find these top tube bags very useful on all my rides.
- Feed Bags: (1) Revelate Mountain Feedbag, (2) Randi Jo Fabrications Bartender Plus
- Over-sized (1 L) water bottles
- These feed bags are fantastic. I like have water bottles right at my fingertips (literally!). Both of these bags include small side pockets, which I use for gummies and other quick snacks.
- Fork Racks: Blackburn Outpost Cargo Cages (2)
- (1) 1 L Water bottle
- (2) Camp chair in a 3 L dry bag
- These fork racks are a new addition to my gear. The Salsa Fargo has braze-ons for fork cages. These cages from Blackburn allow extra water and gear.
My setup allowed for 3 additional water bottles on the frame, making a total of six! That may seem like a lot, but I sweat A LOT and therefore, I drink a lot. I don’t like to run out of liquids!
Gear:
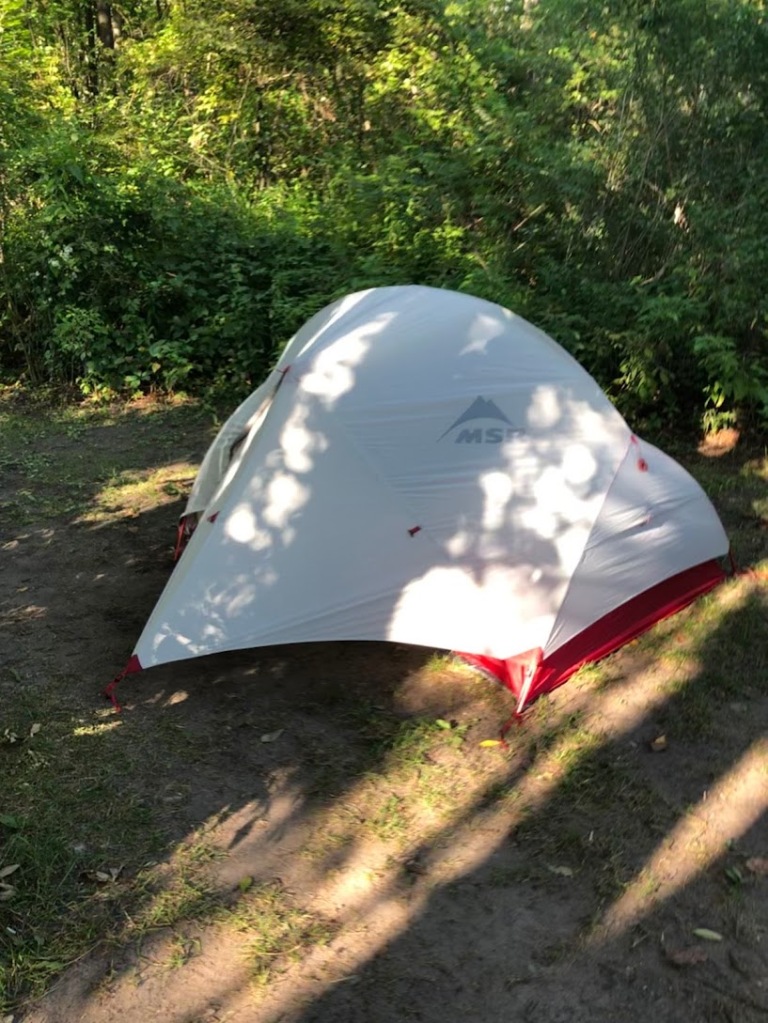
- Tent: MSR Hubba Hubba NX 2-person
- When tent shopping a few years ago, I sat in a one-person tent and felt claustrophobic. This two-person tent provides plenty of room for one person. Now that the tent is a few years old, it’s starting to show some wear. The tent poles need some repair, so I’ve been in contact with MSR and I’m waiting to hear about getting the poles fixed.
- Sleeping Bag: MEC Draco Down Sleeping Bag
- Nice warm down sleeping bag that stuffs into a 5 litre stuff sack.
- Sleeping pad: Sea to Summit Ultralight Insulated Sleeping Mat
- I still have difficulty getting a good night’s sleep when I go bikepacking. It may have to do with my sleeping set up. This mattress is very comfortable and packs to about 1 litre. It also inflates very quickly with a stuff sack that doubles as a hand pump for the mattress.
- Pillow: MEC Air Pillow
- I think this pillow may be part of the reason I don’t sleep well. I have a fussy neck and back and this pillow just never feels comfortable. I’m going to have to try different camp pillows.
- Camp chair: Helinox Ground Chair
- This chair folds up nicely and is fairly light. I didn’t realize how important a camp chair was until I camped without one. How else would you sit around the camp fire?
- Camp stove: JetBoil Flash
- This compact system by JetBoil can boil one litre of water in under 2 minutes. That’s good enough for a quick cup of coffee in the morning plus breakfast oatmeal or cooking dried dinner meals.
There are a lot of references online about “how to backpack”. When I started in 2017, I blogged about my set-up. Some things have changed in my gear since then (including my bike), but I want to mention that there’s no right or wrong way. Some people use bivvies, which are sleeping/mini-tent setups. They’re super light, but they’re not for me. Other cyclists use old-fashioned panniers to carry gear. Unless you’re doing a lot of technical singletrack, panniers will probably suit you just fine, although some bikepacking purists might frown upon it (Actually, I don’t know if there is such a thing as a bikepacking purist).
My point is, you don’t need a lot to get started: A decent mountain, cyclocross or gravel bike, and some basic camping equipment – tent, sleeping bag. And a way to carry gear (it could even be a backpack). Routes are popping up everywhere and I plan to start creating easier and shorter routes, so keep an eye out!

this is awesome… I love cycling too.
LikeLike
Hi Steve, check out this company from Montreal for a top tube bag. I have two and they’ve worked well. Basic with no bells and whistles and good value. But if you want a special feature just email to inquire. I had them add drain holes (grommets) to the feedbags I also bought. I really enjoy your blog!
https://www.atwateratelier.com/collections/all-products-no-add-ons/products/gas-tank?variant=14105880592429
LikeLike
Oh yeah I’ve heard of them. Thanks!!
LikeLike
Very good article I really enjoyed this post Thanks for Sharing check this out.
LikeLike
Thank you so much for this valuable post. This is what I was actually looking for. I will also bookmark this page for future help.
LikeLike
amazing , i will also try to upgrade my cycle
LikeLike