
Now that I’ve completed my “50 memorable rides for my 50th year”, I’ve been thinking about what to write about as I continue this blog. One topic that people have asked me about is bikepacking. In my previous post, my 50th ride involved my first attempt at bikepacking.
I’m still learning about bikepacking and there are a lot of good resources online. There are great bike packs available (handlebar bags, frame bags, seat bags etc.), and over recent months, I’ve acquired a good set of packs. Here are some good websites:
- Arkel: A Quebec-based company that manufactures their products in Canada! They’ve made high-quality panniers for years, and are just getting into bikepacking packs.
- Revelate Designs: Alaska-based company. I know a couple people with Revelate products. They seem very well made. Costs are high, partly due to the US exchange and particularly shipping costs.
- Porcelain Rocket: Another Canadian company. They make seat packs and frame packs. MEC carries some of their products.
Bikepack.ca has a good reference page, with links to other pages (including mine!). Ryan Correy, the founder of bikepack.ca, is an adventure cyclist who has adventure-cycled all over the world, and written a book about it.
Bike Packs
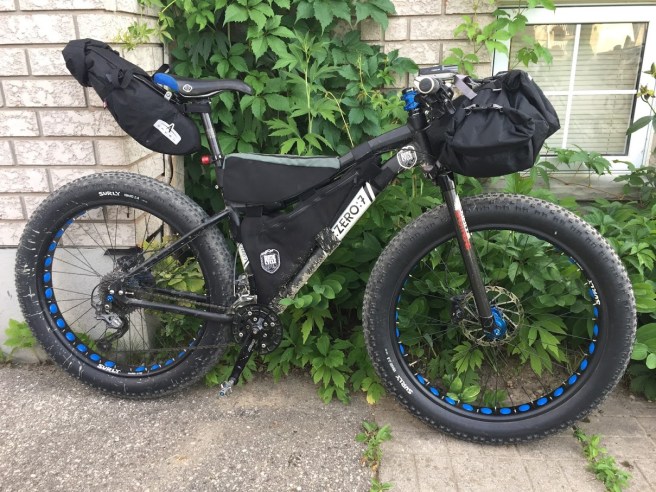
As I mentioned in my previous post, I used a couple of Arkel products. The SeatPacker 15 is a fantastic product that (at 15 litres capacity) held my stove, camp chair, casual clothes, rain jacket, and some food (and probably other things I’ve forgotten). It fastens to the seat and seatpost via a small rack that fixes to the seat rails and post. The rack prevents bag-sway, which apparently can be a problem for these kinds of larger seat bags. Last weekend, there was no noticeable sway during my ride (even on the singletrack trails at Turkey Point).
I have two frame bags. One sits inside the frame triangle. It’s big enough to hold my tent poles (more on the tent later), a 1.5 litre hydration bladder, a hand pump, and a couple other small items. The second frame back sits on the top tube of the frame. It held some snacks, lights, charger, tube and tools. Both frame bags are custom made (by my partner Julie!).
I also have a feed bag that she adapted from an inexpensive chalk bag from MEC. With my frame bags, I could only carry one bottle (on the down side of my down tube where I had a bottle cage), so this feed bag was used to hold a second water bottle). I drink a lot (read: I sweat a lot), so two water bottles plus the hydration bladder was enough for 2-3 hours at the most on the hot days.
This pic shows most of the setup. The water bottle cage on the downtube is missing, as is the feedbag. Also, the seatpack is nowhere near capacity (this is from a test ride I did around town – bags attached but not fully loaded).
Gear
The main pieces of gear are: tent, sleeping bag, sleeping pad and cooking stove. Here’s what I use:
- Tent: There are some great one-person, light-weight tents available for backpacking/bikepacking. I checked out a couple of them but settled on a slightly bigger two-person tent for more space. I must be slightly claustrophobic because the one-person tent seemed cramped. With the two-person, I can store more gear inside if necessary, and I can stretch out more. I have the MSR Hubba Hubba two-person tent (their one-person version is… wait for it… the Hubba, and they have a three-person size called Mutha Hubba and a four-person: Papa Hubba). It’s considered a three-season tent, and I like it, not only for the space, but it has dual vestibules. I also invested in the ground sheet specific for this tent. It packs to a reported 46×15 cm and weighs less than 2 kg. I didn’t pack the tent as one. Rather, I separated the poles and pegs and put them in my big frame bag. The tent, fly and ground sheet I packed in my handlebar bag.
- Sleeping Mattress: After considerable research (done mostly by my bro Greg), I settled on the Big Agnes Insulated Air Core Ultra sleeping pad. I don’t know who Big Agnes is, but she makes great products. This one is a three-season pad that weighs 700 grams and packs very small (20×10 cm, but I’m sure mine packed smaller). It’s comfortable and fills easily.
- Cooking: There are a lot of cooking options available that are light-weight and convenient. I settled on the the JetBoil Flash system. It’s a one-litre model, and stores a 100 g fuel cannister inside. It lights very easily (even in in the semi dark), and boils water in a couple minutes. I used it for the first time last weekend for dinner, morning coffee and oatmeal.
- Sleeping Bag: I used a sleeping bag I’ve had for over two decades. I got it at MEC wayyyy back. It’s a synthetic filled bag (down bags pack smaller), but for now, it served the purpose. At some point, I’ll look at down bags like this one which packs to about half the size of the one I’m using.
- Food: We were only gone one night, so I only had to pack one dinner and one breakfast. For dinner, I tried a Mountain House entree called “Chicken Teriyaki with Rice”. It was surprisingly good, and although I thought it was too much food after preparing it, I ate it all without feeling too stuffed. For breakfast, I brought Stoked Oats which were yummy, and had some Starbucks VIA instant coffee (as good as instant coffee gets, as far as I can tell).

Excellent details sir!! And via coffee…as good as ground fresh in my opinion!!
LikeLike